A Conjure Piglet Client
by Laurence Chen
“Laurence, are you interested in Piglet? Do you want to help develop Piglet?” Arne asked me. Piglet is the new language he recently released, of course, another Lisp.
“Sure, where should I start?” I replied.
“You have two options: (1) Learn Emacs, because I’ve already developed an Emacs plugin for Piglet. (2) Develop a Neovim plugin.”
I chose option (2), and thus this project began.
After quickly reading the Piglet documentation and the Emacs Plugin, my initial plan was as follows:
- First, develop Fennel code to handle the Piglet Dev Protocol, aiming to enable communication between Neovim and the Piglet REPL.
- Then, wrap the code from step 1 into a new Conjure client so that Conjure can support interactive development in Piglet.
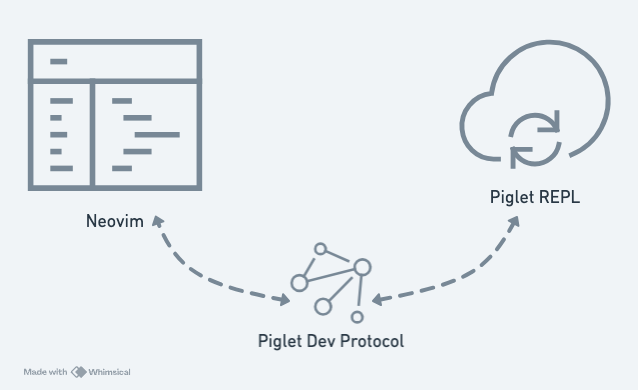
Piglet’s Piglet Dev Protocol (PDP) is its interactive development protocol. The workflow is: the editor opens a WebSocket server, the Piglet REPL connects as a client, and both communicate via CBOR (Concise Binary Object Representation, a binary data encoding format).
The diagram below illustrates the Piglet Dev Protocol: the editor and REPL communicate over WebSocket, with CBOR-encoded data packets in between.
Initially, I naïvely thought that I could complete the PDP just by installing some Neovim plugins or Lua libraries. Once I started, I realized it was far more difficult than I had imagined.
Porting the WebSocket
After trying several options, the library that best met my needs was lua-websockets. Other options either only implemented a WebSocket client or were not pure Lua. To ensure the Conjure client would remain easy to install in the future, I decided to stick with a library installable via Luarocks.
For convenience in testing, I also installed websocat so I could focus on testing the WebSocket without combining it with CBOR.
Soon, I successfully created a WebSocket echo server using lua-websockets. Then the first challenge appeared: “Although a client created with websocat can successfully connect to the WebSocket server running in Neovim, once the client disconnects, Neovim freezes entirely.”
What was happening? The issue was that using lua-websockets with Neovim was inherently problematic. lua-websockets provides two asynchronous mechanisms: lua-ev or copas (coroutine). However, neither uses Neovim’s vim.uv underneath. In other words, the approach effectively ran two event loops (one from Neovim, one from lua-websockets), which naturally caused the freezing.
Once I understood the cause, the solution became clear: there should only be a single event loop. I decided to modify lua-websockets to rely on Neovim’s vim.uv. In short, I decided to port lua-websockets to vim.uv.
After reviewing lua-websockets’ source code, I realized the focus of the port should be src/websocket/server_ev.lua.
I used an LLM to assist with this porting. After trying two prompts, I finally completed a usable WebSocket server.
- Prompt 1
Rewrite src/websocket/server_ev.lua so it can run in Neovim.
Note: The original implementation depends on four libraries:ev,loop,websocket.ev_common,socket. Remove these dependencies and usevim.uvinstead.
…
The code generated by Prompt 1 was mostly usable, but one function, message_io, was seriously hallucinated. This hallucination was reasonable because I hadn’t realized that websocket.ev_common is actually a core part of server_ev.lua rather than an external dependency.
I then used a second prompt to fix this issue.
- Prompt 2
Consider
message_ioin src/websocket/ev_common.lua, which depends on Lua socket and the lua-ev loop. Refactormessage_ioso that the socket inside is replaced by the value returned fromvim.uv’suv.new_tcp(), meaning it supports functions likeread_startandwrite. …
CBOR and Service Provider Interface
Once the WebSocket was working, I immediately encoded messages with CBOR and sent them to the Piglet interpreter for evaluation. Unexpectedly, it failed immediately. I inspected the CBOR-encoded output on the Piglet side using cbor.me and discovered the reason.
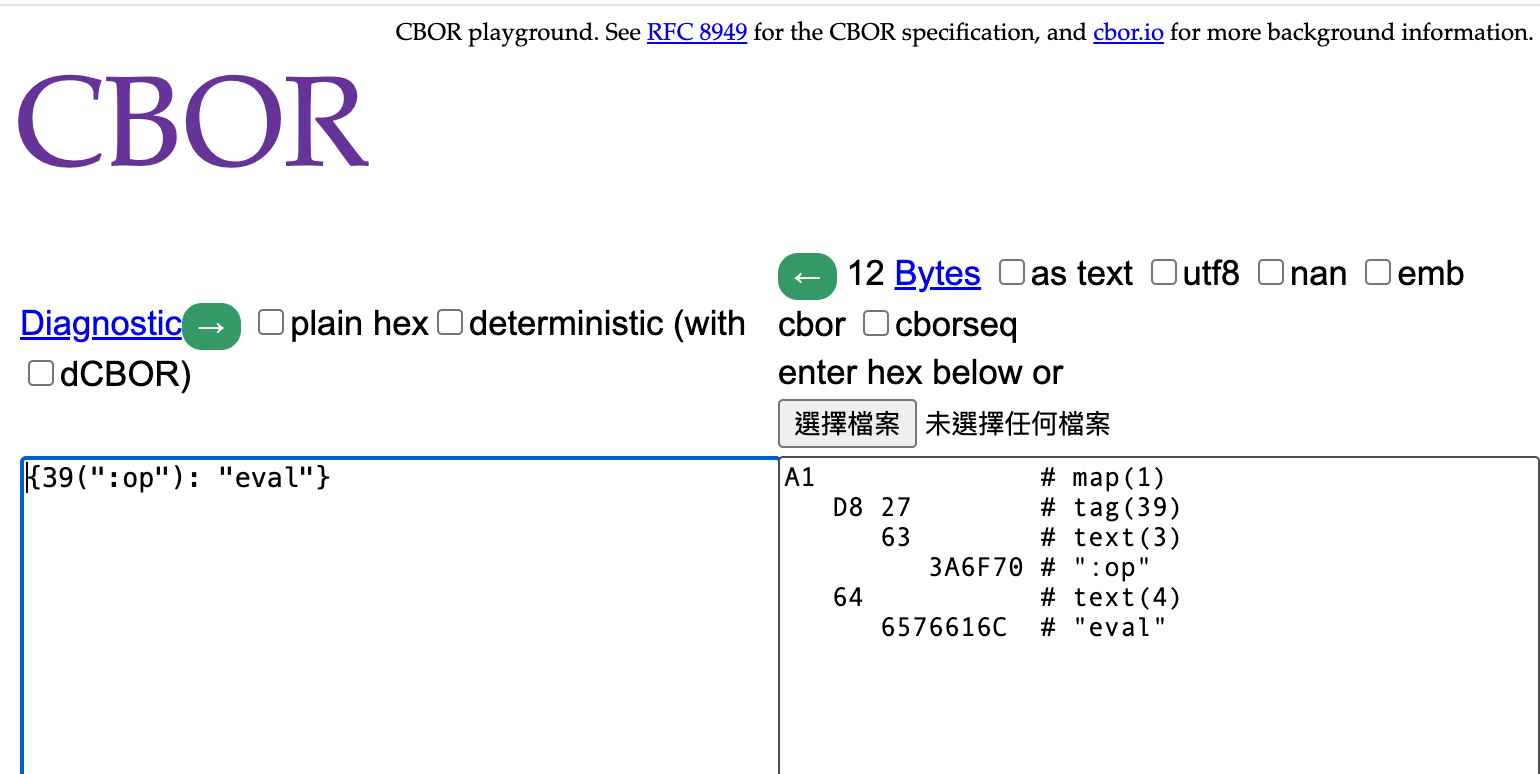
The problem was that Piglet expects a tag 39 to be added before any keyword in CBOR encoding.
Since the spc476/CBOR README was concise and I was unfamiliar with Lua—even to the point of struggling with setmetatable—I got stuck: “How exactly should I call the Lua CBOR library to insert tag 39 correctly and ensure it modifies the keywords in the message?”
During development, I asked the LLM several times, and it suggested various ways, none of which were correct.
Eventually, I abandoned the LLM and carefully read the README and Lua API. Finally, I found a solution.
(local cbor (require :org.conman.cbor))

;; Define a keyword function to register a __tocbor method
(fn keyword [s]
  ;; keyword changes the string $s => `:$s`
  ;; returns a table {:v $changed_string} with a __tocbor function in its metatable
  (let [t {:v (.. ":" s)}
        mt {:__tocbor (fn [self]
                        (cbor.TAG._id self.v))}]
    (setmetatable t mt)))

;; Declare a msg where keys are wrapped with the function above
(local msg {(keyword "op") :eval (keyword "code") "(+ 1 1)"})

;; Encode the entire msg with cbor.encode, which calls __tocbor
(cbor.encode msg)
Reflecting on this difficulty, I realized that since LLMs can only do pattern matching, it’s natural that they struggle with niche languages like Lua or minimal READMEs.
Furthermore, CBOR libraries are designed to be extensible, often using a loosely coupled mechanism. In object-oriented languages like Java or Lua, this is typically implemented via Java interfaces or Lua metatables, forming a Service Provider Interface (SPI). If an old module needs replacement, you can create a new module implementing the same Java interface or Lua metatable function, and it will seamlessly replace the old module.
Thus, if I encounter a similar situation in the future, I should think as follows:
- Is the feature I need something the library author might not have initially covered? (Tag 39 in CBOR is an example.)
- If so, does the library provide a Service Provider Interface for modification? (Lua metatable
__tocboris this interface.) - Can I inject my own code through the Service Provider Interface? (I ultimately did this via metatable to insert custom encoding logic.)
Filetype Registration and Conjure
Once WebSocket and CBOR were working, I attempted to integrate my code into a Conjure client template.
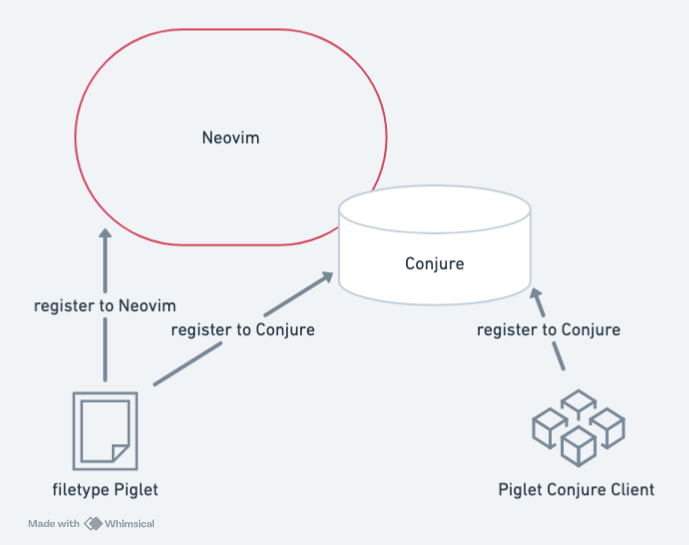
I initially expected that after registering the new Piglet client with Conjure, it would work immediately. It did not. As shown below, there are actually three places that require registration:
- Let Neovim recognize the Piglet filetype.
- Enable Conjure for Piglet files.
- Make Conjure use the Piglet client for Piglet files.
Finally, the new Conjure Piglet client was created, though it only supports basic eval-str functionality.
Conclusion
During development, I read a lot of Conjure and Piglet Emacs Plugin source code. My approach was:
- Don’t aim to understand everything at once; grasp pieces at a time.
- Try to follow the code execution path.
- Use string search to jump through the code.
Since the Conjure Fennel client does not support jump to definition, step 3 was particularly painful. Perhaps in the future, I should try to implement jump to definition in the Conjure Fennel client.